Wednesday, July 20, 2011

Hemingway on Style

Steven Pressfield has posted George Plimpton’s famous interview of Ernest Hemingway.
Something that Hemingway said really struck a chord with me:

INTERVIEWER
Could you say how much thought-out effort went into the evolvement of your distinctive style?
HEMINGWAY
That is a long-term tiring question and if you spent a couple of days answering it you would be so self-conscious that you could not write. I might say that what amateurs call a style is usually only the unavoidable awkwardnesses in first trying to make something that has not heretofore been made. Almost no new classics resemble other previous classics. At first people can see only the awkwardness. Then they are not so perceptible. When they show so very awkwardly people think these awkwardnesses are the style and many copy them. This is regrettable.
I was reminded of a quote.  I don't remember the source, but it was basically that a person's style is the sum of their deficiencies.
Style should be a choice, not an excuse for bad craft.

Sunday, July 3, 2011

How to Stop Being a Frustrated Creative

If you're like me, you have a desire to create things.

If you're like me, you also have a particular nagging problem:

When I'm creating something, I get aggravated because I'm not getting the result I want, and I'm not talking about feeling frustration at the end of a project.  I get frustrated in the middle of the project!


I've always looked to the end of things too quickly.  My 12th grade Calculus teacher told me I messed up math problems because my mind got ahead of itself.

But watching a friend of mine on the computer a month ago helped me realize what I've been doing wrong.

He was designing T-shirts on the computer.  I got to see his process.  He would quickly start with an idea instead of taking a long time to think about what to do.  He would just get started.  Then, once he had a rough draft down, he would correct issues he didn't like one at a time.

That was the clincher for me.

I've always thought about designs in total, and I would try to manipulate too many variables at once.

Instead, my friend would find one thing that irked him and fix that.  Then he would fix something else.  Then something else.  Before too long, he ended up with something he liked.

This change in thinking represents the difference between enjoying the work process and trying to get to the finish line as fast as you can.  Ironically, in trying to finish your work too quickly you slow yourself down with frustration and mistakes.  When you enjoy the process and fix your problems one at a time, your work is completed faster.

This mindset can be applied to anything.  You could be writing a song.  Instead of getting frustrated because the song sucks, fix the problems with it one at a time.  This melody isn't catchy enough...this turnaround is boring...this chorus is too long...etc., etc.  Before too long, you've got a much better song.  More happily, you have a much better completed song.

Don't think about how much you dislike something you've made.  Just fix what you don't like about it one little issue at a time.

Saturday, June 18, 2011

Changing Stroke Settings in Illustrator

I'm gonna show you something else nifty in Illustrator.

You can change the way letters and objects are stroked.  You'll find those settings here:


You'll notice those 6 little boxes next to the stroke weight drop box.

A stroked pen path will show us the effects of the top three options.  The first box is the default setting.  The line terminates in a "Butt Cap" that ends in a flat line at the last point:


The second option rounds off the end of the line and is appropriately called "Round Cap":


The third option is flat like the "Butt Cap," but the end juts out from the end of the last point.  This options is called "Projecting Cap."


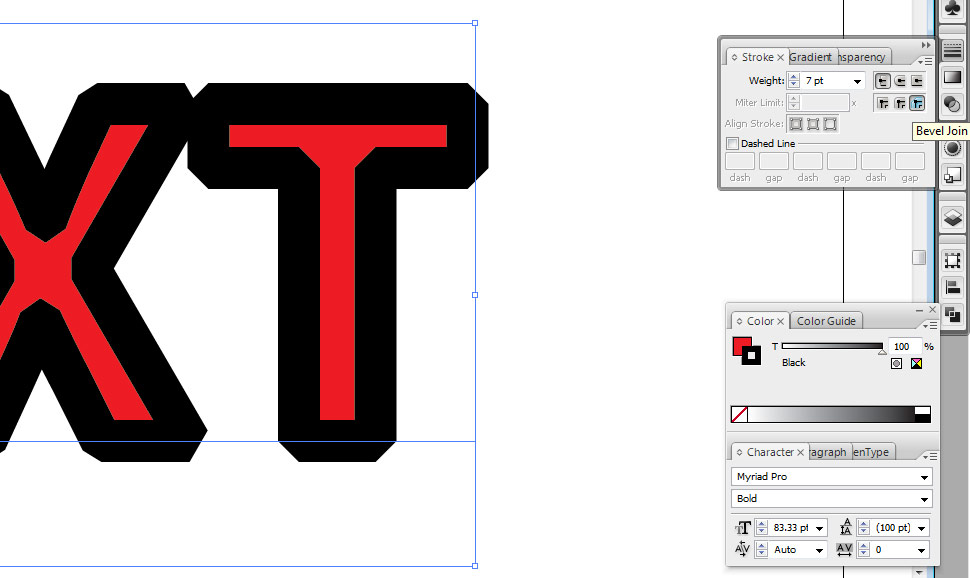
The bottom three options are best illustrated with stroked text.  The default option is called a "Miter Join."


The second option is called "Round Join."  The effect is that all the corners become rounded:


The third option is called a "Bevel Join."  The effect is that the corners terminate as angles:


There are many applications for these stroke options.  I mostly use different settings to fix text that is exhibiting a weird stroke.  For example, suppose you need a huge stroke on some text, but the lines end up looking like this:


A good way to fix this is to change the stroke settings to "Round Join."  This is what you end up with:


You could place this behind unstroked text to create a nice stroke effect that doesn't eat into the letters.


Enjoy :)

Friday, June 17, 2011

Know Your "Place"

There is a handy-dandy little function in Adobe Illustrator called "Place."

You can find it here:


If you haven't tried it, allow me to introduce you.

Suppose you want to bring an image into Illustrator, but you anticipate that the picture may change.  For example, I was recently working on a piece of concept art for a contest.  I scanned the drawing and fixed it up a little in Photoshop, but I wanted to add some text.  I like Illustrator for text, so I saved the drawing as a .PSD (Photoshop Document).

I placed the .PSD in the Illustrator file and added text.  After adding the text, I decided to alter the drawing.  I made changes to the .PSD and saved.  Once the .PSD is changed and saved, Illustrator recongnizes that the original placed file has changed and automatically updates the image.

This function is fantastic for certain types of work.

And now you know how to use it.  Enjoy!

BTW, here is the concept art i was working on:


Thursday, June 2, 2011

5 Super Useful Shortcuts for Illustrator Users


I'm a Graphic Designer, which means I use Illustrator a lot.

In an attempt to help my fellow budding Graphic Designers, here is a short list of 5 super useful shortcuts.

1)  Do you click on the General Selection Tool when you want to deselect something?  Why bother?  Hit Alt-Ctrl-A instead and you will magically deselect everything.

2)  Maybe you need to select the stroke on an entire line of expanded text.  You could click on every stroke, or you could move up to your toolbar and hit Select > Same.  You can choose to select all objects with the same fill, stroke, stroke weight, etc.  Super time saver.  Seriously.

3)  Relating to the Select > Same function is the Hide command.  Suppose you want to select all objects that are filled with red, except for one lowly graphic outside the art board.  Select the offender and mash Ctrl-3.  Voila, the object disappears.  When you're ready for it to reappear, just push Alt-Ctrl-3.

4)  Perhaps you have some text you want to edit on top of a shape.  If you try to drag the selection tool you will select the background shape and the text.  Solution?  Select the shape and push Ctrl-2.  Your selection will lock, which means it can't be selected until it's unlocked.  You unlock it by smacking Alt-Ctrl-2.

5)  If you want to copy a shape, rather than selecting copy and paste, just hold Alt while you drag the object.

There you go.  5 useful shortcuts.  Enjoy!

Wednesday, May 11, 2011

2 Kinds of Creatives

There are 2 kinds of creative folk.

Number 1 is the Happy Creative.  This is the person who creates from a place of curiosity and fun.  He enjoys making things.  He's happy with what he makes.  He likes to try out techniques and solve problems.  Creating things makes him happy.

Number 2 is the Frustrated Creative.  He is motivated by a need for accomplishment and haunted by feelings of incompetence.  He's dissatisfied with most things he makes.  He's compelled to get better because he can't stand being bad at something.  Creation for this kind is frustrating.

Both kinds of Creatives feel compelled to make stuff.  The difference is that one enjoys the process and the other is frustrated by it.

I'm a creative of the second kind.  I feel compelled to make things.  I like to make things.  But, making things is extremely frustrating to me because I can't stand my own incompetence.

I've decided that I'd like to be more like the first kind than the second.

Cross your fingers for me.

Tuesday, May 3, 2011

Random Inking Tip

I picked up this little nugget the other day.

Hold your drawing at an angle when you're inking, either by using a drawing table or inclining your drawing board.  You'll see your drawing more accurately when you ink at an angle.